


To a lot of beginners, documentation isn’t a skill worth stressing over. You might ask, why should I document my code? After all, it’s called my code for a reason, I wrote every single line of it, so why would I want to remind myself of what I already know?
Well, the human brain isn’t immune to forgetting things, and most times you aren’t the only one working on a project. How do you, as the new developer in a team, get started sifting through your team's already large code base? So do you see why now?
Well, you are here, so I guess you have already decided to learn, let’s skip the long talk and get down to some learning, shall we?
For this tutorial, i hope;
That at the very least, you have a basic knowledge of programming, preferably python, nothing special though.
Intend on using sphinx for your documentation.
Have a terminal to work with.
Lets get started!
What’s Sphinx?
Sphinx is a documentation generator written by Georg Brandl that translates a set of plain text source files into various output formats, automatically producing cross-references, indices, etc. And most importantly intelligent and beautiful documentations.
It was created for Python documentation , and it has excellent facilities for the documentation of software projects in a range of languages.
Sphinx uses a markdown language called reStructuredText, and can output in multiple formats, including; HTML (including Windows HTML Help), LaTeX (for printable PDF versions), ePub, Texinfo, manual pages, plain text.
Why Sphinx?
Multiple Output Formats
Extensive Cross References
Hierarchical structure
Automatic Indices
Code Handling
Extensions
Contributed Extensions
Installing Sphinx
Debian/Ubuntu
$ apt-get install python3-sphinxRHEL, CentOS
$ yum install python-sphinxmacOS
$ brew install sphinx-docAnaconda
$ conda install sphinxWindows
$ choco install sphinxPython pip
pip install -U sphinx
Sphinx highly advises that you use a virtual environment, and frankly you should use virtual environments when working on your projects. You can find more about python and virtual environments here .
Setting up sphinx
After installation, we need to generate a sphinx source directory. To do so, navigate to the base directory of your project folder, and in your terminal run:
$ sphinx-quickstart docs
You will be asked a couple of questions to help during setup. Here is a typical scenario.
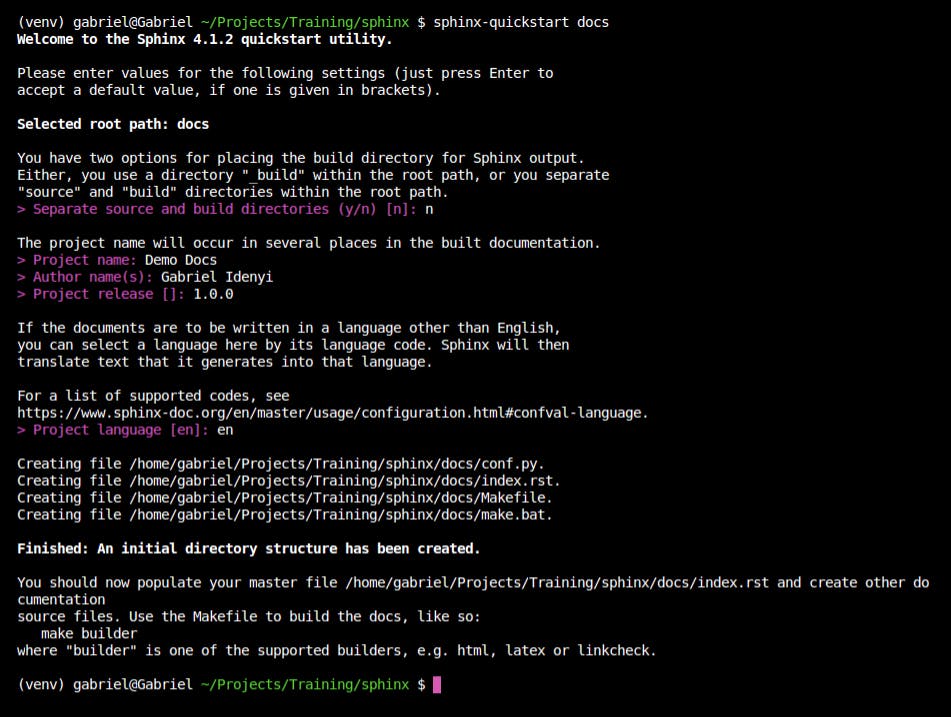
If successful, sphinx creates a docs folder (or whatever name you replace docs with in the command above) in the base directory with a couple of new files & folders inside.
Understanding Sphinx Structure
Our Sphinx directory is now set up, but we aren’t quite ready yet. If you followed the image above, you will a folder structure like this in your code base:
    \docs
         \_build
         \_templates
         conf.py
         index.rst
         Makefile
         make.bat
Thankfully, the documentation explains what most of these files are, so let’s take a look;
build/ - An empty directory (for now) that will hold the rendered documentation.
make.bat and Makefile - Convenience scripts to simplify some common Sphinx operations, such as rendering the content.
conf.py - A Python script holding the configuration of the Sphinx project. It contains the project name and releases you specified to sphinx-quickstart, as well as some extra configuration keys.
index.rst -The root document of the project, which serves as a welcome page and contains the root of the “table of contents tree” (or toctree).
That’s a bit too much for now, let's understand sphinx's unique markdown language and start writing some documentation.
reStructuredText - Understanding Sphinx markdown language
reStructuredText (reST) is the default plaintext markup language used by both Docutils and Sphinx. I can’t cover the entirety of the reStructuredText markdown language right here, but I can provide you with the basic and most used syntax. Don’t worry though, you can find the rest on the docs whenever you want.
Headings - To create one, write your text, and underline using the “=” sign, at least to the text’s length.
      This is a heading example
      ===========================
If you are familiar with HTML or git README files, you probably expect something similar to heading levels. Well, you can create multiple types of heading in sphinx, but these syntaxes aren’t necessarily in a chronological level. They include:
#: with overline, for parts*: with overline, for chapters=: for sections-: for subsections^- for subsubsections**“**- for paragraphsHeadings are mostly used to generate the table of contents and breadcrumbs on sphinx, so use it properly, a good title is always advised.
Paragraphs – They are probably the easiest to write, and easily the most often used. They might be just a chunk of text, with no special character for identification. But it has two very important rules over how they should be used;
- All lines must be left-aligned
They must all have the same indentation
pretty easy right? Okay, let’s move on to the next one.
Inline Markup -
- Italics – Simply wrap text in two asterisks, eg:
*text* - Bold – Wrap text in two asterisks, eg:
**text** code samples – wrap text in two backquotes, eg
textA few notes and rules on using inline markup.
- If asterisks or backquotes exist in text or no-word characters, use a backslash to escape them.
- Inline markups may not be nested.
- Inline markup contents may not start or end with whitespaces.
- They must be separated from surrounding text and non-word characters.
- Italics – Simply wrap text in two asterisks, eg:
Lists – To create a list, just place an asterisk in front of a paragraph and indent properly.
You can create both a bullet list and numbered list, and lists can as well be nested.
- Bullet List – simply start your paragraph with an asterisk.
Numbered lists – simple start with a number or the hash sign and the period sign.
  * This is a bullet list
  * This as well

  1. This is a numbered list
  #. This as well
      #. This is a nested list
Literal Blocks – Also called literal code blocks or code blocks. They are used to render codes. To use a literal block at the most basic level, simply end the last paragraph with a double column, and begin the next line with an indentation and a blank space between.
      This is a parapgraph::

          This is a literal block

      This is another paragraph
For most cases however, you will want to enable its code highlighting feature. That’s easy as well, maybe I shouldn’t have bothered teaching you the basic one after all. But, what’s done is done. Here’s how to use the literal block with code highlighting enabled.
      This is a paragraph

      .. code-block:: console

          This is a literal code block with console highlights
The code type to highlight is specified after the code-block initialization. While Pygments can guess the lexer based on contents (for languages like python, rest, c, etc), it's always easier and pain-free to specify it yourself.
- External Links – External links are links/URLs on the world wide web. Linking to them is a piece of cake.
`Title <Url>`_
Cross Referencing - There are many ways to handle internal links, but honestly I rarely ever use most of these. I will however show you one that I use most often, see here if you want to know more about cross-referencing.
To reference a particular section of your docs, you need to place a label, think of it as a marker to help sphinx know exactly the location you are looking for. To add a marker, on your location of choice add.
.. _label-name:Now you have marked this location, let's tell sphinx we want to see this page whenever we click a text somewhere else. To do this, simply.
:ref:`label-name`or
:ref:`Title <label-name>`I would advise you go with the second style, it’s a lot more intuitive, and frankly speaking, I’ve had issues with the first one at times, and no loves issues to be honest.
- Notes – A note can be created using a note directive.
.. note:: This here is a note.
- Images – Images are fun, aren't they? Well, it's a good thing the guys at sphinx love images as well, so they made adding one pretty easy, take a look?
.. image:: image-path <eg: https://dbdzm869oupei.cloudfront.net/img/sticker/large/13639.jpg>
Tables - There are two ways to create a table, the easy and the not-so-easy way. In this tutorial, I'll be teaching you the not-so-easy way, simply because it has fewer limitations compared to its counterpart, and I also love painting.
+----------+----------+-----------+----------+
| Head 1   |  Head 2  |  Head 3   |  Head 4  |
| (rows)   |          |           |          |
+==========+==========+===========+==========+
|  Body 1  |  Body 2  |  Body 3   | Body 4   |
+----------+----------+-----------+----------+
|  Body 5  |  Body 5  |  Body 7   | Body 8   |
+----------+----------+-----------+----------+
Notice the first line is underlined by an equal (=) sign, not a hyphen (-)? That’s because it contains the table header, and the rest contain the table body.
One more thing, Comments; They are those lines that are not necessarily valid markup construct, they are better explained as notes for one's self. There are two ways to create them.
- single line comment:
.. This is a comment - multi-line comment:
..
This whole indented block
is a comment
..
Writing documentation!
If you have been following from the start, you should have a docs folder in your project by now, with the bare minimum sphinx file/folders within. If not, please take a minute to read the installation and setting up the sphinx section.
In your docs folder, create a new folder, let’s call this modules. You are free to call it anything you want. Within this folder, let's create two files overview.rst and more.rst, again these file names are not reserved, you can call your's bacon.rst, well not bacon, but you get what I mean by now. We’ll get back to these files in a minute.
Open the index.rst file in the docs folder, and right under the .. toctree::, add both files paths we have just created, like this. ‘modules/overview.rst’ and ‘modules/more.rst’.
Both should take a line of their own and should maintain the indentation as the lines :maxdepth: and :caption:, which should already exist under the toctree block.
This tells sphinx to add these files to the docs tree.
Here’s a typical example of what your file should be like:
Welcome to Demo Docs's documentation!
=====================================

.. toctree::
   :maxdepth: 2
   :caption: Contents:

   modules/overview.rst
   modules/more.rst
   modules/autodocs.rst


Indices and tables
==================

* :ref:`genindex`
* :ref:`modindex`
* :ref:`search`
Now open the conf.py file and uncomment the following lines.
import os
import sys
import sys.path.inset(0, os.path.abspath(‘.’))
These should be somewhere around lines 13 to 15.
Next change the last line from
import sys.path.inset(0, os.path.abspath(‘.’)
to
import sys.path.inset(0, os.path.abspath(‘..’)
Notice the abspath dots are two not one anymore? This is to help sphinx locate our files properly.
A very important note.
Remember at the start of this tutorial where we said sphinx can generate documentation from a set of plain text source files? If you’d like to do that for python docstrings, add ‘sphinx.ext.autodocs’ to the list extensions=[] in conf.py and follow the instructions by sphinx here .
Sorry, I won’t be going deep about the autodocs here, since the aim of this article is to introduce you to sphinx and not the autodocs feature. However, I won’t just leave you empty-handed, here is a hint to use your python docstrings as part of the documentation.
In your desired rst file under modules or an equivalent, add the following lines.
.. automodule:: <python path to file, eg: app.views>
    :members:
    :undoc-members:
That’s that, let forge ahead. I’d like to change my sphinx theme, I believe you do too.
In your conf.py file, find the variable html_theme ="alabaster" and change the string to let's say “pyramid”.
You can find more themes here . Some are inbuilt as you will see labeled, the rest you’d have to pip install yourself before you can use them.
Back to our modules folder, we are nearly done now.
Open the overview.py in modules and add the text below, notice they are all writen in reStructuredText markdown as you have learned above. Look closely to see if you can understand them all? You should, after all, you are now a sphinx pro.
overview
=========

This has nothing to do with an overview.
Here, I'll try my possible best to feature Sphinx's most used markdown syntax.

Lets see the different sphinx headings

###############
Parts heading
###############

*******************
Chapters heading
*******************

Sections heading
=====================

You have already seen paragraphs used above, so no need for that. However,
you haven't seem inline markups. So, lets see: **Bold**, *italics*, ``code samples``

Now Lists

- bullet lists
    - This is nested
- This is not
    - This is nested
    - This as well
        - Even further nested

#. bullet lists
    1. This is nested
#. This is not
    1. This is nested
    2. This as well
        #. Even further nested

How about notes? Oh i have a cool trick on this as well.

.. note::

    This here is a note.

.. seealso::

    But this is a seealso note

.. warning::

    And this is a warning note

Lets talk code blocks now, this a basic one with no code highlighting::

    $ sudo disable code highlightings

This one has code highlighting for console

.. code-block:: console

    $ sudo enable code highlighting

This one has code highlighting for Python

.. code-block:: python

    >>> def pythonFunc(greeting="Hello Gabriel!")
            print(name)

Well, a sad news is my twitter hasn't been active for a while, i think people dislike me!!! :(
but am thinking of being active once more, so i'll share the link using the sphinx external link.
Maybe that will make you like me.
please follow me on twitter `@idenyigabriel <https://twitter.com/idenyigabriel>`_

For tables, we will talk about that in the installation file, just so you see how cross referencing works.
So head to :ref:`Tables <tables>` to know about tables
Do the same for more.rst
more
=============

.. _tables:

I'll be leaving my table example here. Pretty wise right?

Here is the basic table i said had some limitations

============== ============== ============== ==============
 head 1         head 2         head 3         head 4
============== ============== ============== ==============
Body 1         Body 2         Body 3         Body 4
Body 1         Body 2         Body 3         Body 4
============== ============== ============== ==============

The limitation with this, is they must contain more than one row,
and the first column cells cannot contain multiple lines.

So, use this instead.

+----------+----------+-----------+----------+
| Head 1   |  Head 2  |  Head 3   |  Head 4  |
| (rows)   |          |           |          |
+==========+==========+===========+==========+
|  Body 1  |  Body 2  |  Body 3   | Body 4   |
+----------+----------+-----------+----------+
|  Body 5  |  Body 5  |  Body 7   | Body 8   |
+----------+----------+-----------+----------+

Damn, I almost forgot about images.
Well, good thing it's pretty easy.
So???

.. image:: https://static.wikia.nocookie.net/sofiathefirst/images/0/0e/Sphinx.png/revision/latest?cb=20180523200751
Bonus
I couldn’t get myself to not at least show you how the autodocs feature works, so here I am. Create a new file under modules and call this autodoc.rst and add the following lines.
Autodocs for Python app
========================

.. automodule:: app.app
   :members:
   :undoc-members:
Now in the same directory level as docs create a folder called apps, and a file called app.py inside. Your folder structure should now look like this.
    \docs
        ...
    \apps
        app.py
Now, add the following lines of code to app.py.
from getpass import getpass
import sys

def RegisterationSimulation():
    """
        Honestly, this python function does nothing special.
        It's just a way to help you understand how autodocs in sphinx actually works
        stay happy!!!
    """
    try:
        name = input('Enter name >>> ')
        email = input('Enter email >>> ')
        if str(email.find('@')) == '-1':
            raise Exception('Provide a valid email')
        password = getpass('Enter password >>> ')
        confirm_password = getpass('Confirm password >>> ')
        if password != confirm_password:
             raise Exception('passwords do not match')
        print(f'saving user {name} ... ')
        print('user successfully saved!!!')
    except Exception as e:
        print(e)
    finally:
        print('exiting ...')


if __name__ == '__main__':
    sys.exit(RegisterationSimulation())
Don’t forget to add modules/autodocs.rst to index.rst toctree like the rest.
Now from the docs root directory, run the special sphinx command make html in your terminal, and sphinx should generate a nice documentation for you. But wait, where are these generated files?
Open the _build folder and then the HTML folder in it. In there you’ll find an index.html file, open this in a browser, and see how well you did.
On a final note, sphinx will report a warning, if you are linking to an empty file from index.rst so resist any urge to do so. Other than that, it does a good job of reporting errors, so you shouldn't have much of a problem.
Did you enjoy this piece? Happy coding!!!